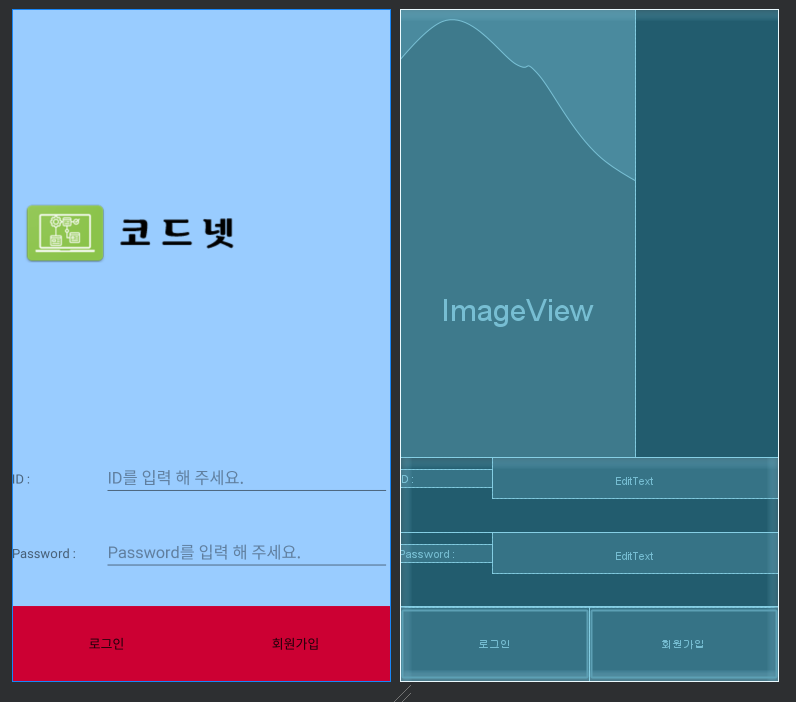
안드로이드 스튜디오 앱 만들기 로그인 화면 레이아웃 예제
Layout을 활용하여 만든 간단한 레이아웃 UI입니다. 구현하려는 앱에 참고해보시기 바랍니다.
레이아웃을 사용 할 줄 안다면 누구나 쉽게 구현 할 수 있습니다.
1. 기획

기획이라고 거창하게 할 필요가 없습니다. 대략적으로 어떤 위치에 어떤 요소가 있어야 할지 정해두어야 레이아웃을 작성하기 쉬워집니다. 저는 그림판으로 대략적인 기본 로그인화면을 만들었고 이것을 참고로 구현 할 것입니다.
제대로 된 기획을 배우고 싶으시다면 여기에서 참고 해주세요.
[앱 비지니스] 기획의 개요 및 기획서 작성 방법
[앱 비지니스] 기획의 개요 및 기획서 작성 방법
앱(어플)의 기획 및 기획서 작성 방법 1. 앱(어플)의 기획단계 앱을 만들려고 한다면 어떤것을 먼저 생각해야 할까요? 1-1. 어떤 앱인가? 요즘은 누구나 소형화된 컴퓨터인 스마트폰을 가지고 있고
codenet.tistory.com
2. 구조 분석
기획한것을 보고 어떻게 구현 할 것인지 구조적으로 먼저 생각하고 코드를 짜면 작업시간이 훨씬 빨라집니다.
가장 기본적인 LinearLayout (리니어 레이아웃)만을 사용하여 구현 해 보겠습니다.

3. 프로그래밍
구조 분석을 토대로 레이아웃으로 나누어 준 뒤 알맞는 뷰를 배치하여줍니다.
<?xml version="1.0" encoding="utf-8"?>
<LinearLayout xmlns:android="http://schemas.android.com/apk/res/android"
    xmlns:tools="http://schemas.android.com/tools"
    android:layout_width="match_parent"
    android:layout_height="match_parent"
    tools:context=".MainActivity"
    android:background="#99ccff"
    android:orientation="vertical">
    <ImageView
        android:layout_width="wrap_content"
        android:layout_height="0dp"
        android:layout_weight="2"
        android:src="@drawable/logo2"
        />
    <LinearLayout
        android:layout_width="match_parent"
        android:layout_height="0dp"
        android:orientation="vertical"
        android:layout_weight="1"
        >
        <LinearLayout
            android:layout_width="match_parent"
            android:layout_height="0dp"
            android:layout_weight="1"
            >
            <TextView
                android:layout_width="100dp"
                android:layout_height="wrap_content"
                android:text="ID : "
                />
            <EditText
                android:layout_width="match_parent"
                android:layout_height="wrap_content"
                android:hint="ID를 입력 해 주세요."
                />
        </LinearLayout>
        <LinearLayout
            android:layout_width="match_parent"
            android:layout_height="0dp"
            android:layout_weight="1"
            >
            <TextView
                android:layout_width="100dp"
                android:layout_height="wrap_content"
                android:text="Password : "
                />
            <EditText
                android:layout_width="match_parent"
                android:layout_height="wrap_content"
                android:hint="Password를 입력 해 주세요."

                />
        </LinearLayout>
        <LinearLayout
            android:layout_width="match_parent"
            android:layout_height="0dp"
            android:layout_weight="1"
            >
            <Button
                android:layout_width="match_parent"
                android:layout_height="match_parent"
                android:layout_weight="1"
                android:text="로그인"
                android:background="#cc0033"
                />
            <Button
                android:layout_width="match_parent"
                android:layout_height="match_parent"
                android:layout_weight="1"
                android:text="회원가입"
                android:background="#cc0033"
                />
        </LinearLayout>
    </LinearLayout>
</LinearLayout>

4. 디자인
대략적인 요소는 다 들어가 있지만 누가보아도 이 UI 디자인은 예쁘지가 않습니다.
요소를 꾸며 줄 뷰에 다양한 속성을 넣어 디자인을 해줍니다.
뷰의 속성에 margin과 gravity만 넣어줘도 깔끔한 UI가 완성됩니다.
<?xml version="1.0" encoding="utf-8"?>
<LinearLayout xmlns:android="http://schemas.android.com/apk/res/android"
    xmlns:tools="http://schemas.android.com/tools"
    android:layout_width="match_parent"
    android:layout_height="match_parent"
    tools:context=".MainActivity"
    android:background="#99ccff"
    android:orientation="vertical">
    <ImageView
        android:layout_width="wrap_content"
        android:layout_height="0dp"
        android:layout_weight="2"
        android:layout_gravity="center"
        android:src="@drawable/logo2"
        />
    <LinearLayout
        android:layout_width="match_parent"
        android:layout_height="0dp"
        android:orientation="vertical"
        android:layout_weight="1"
        android:layout_marginBottom="25dp"
        android:layout_marginTop="25dp"
        >
        <LinearLayout
            android:layout_width="match_parent"
            android:layout_height="0dp"
            android:layout_weight="1"
            >
            <TextView
                android:layout_width="100dp"
                android:layout_height="wrap_content"
                android:gravity="center"
                android:text="ID : "
                android:layout_marginLeft="5dp"
                />
            <EditText
                android:layout_width="match_parent"
                android:layout_height="wrap_content"
                android:gravity="center_vertical"
                android:hint="ID를 입력 해 주세요."
                android:layout_marginRight="25dp"
                />
        </LinearLayout>
        <LinearLayout
            android:layout_width="match_parent"
            android:layout_height="0dp"
            android:layout_weight="1"
            >
            <TextView
                android:layout_width="100dp"
                android:layout_height="wrap_content"
                android:gravity="center"
                android:text="Password : "
                android:layout_marginLeft="5dp"
                />
            <EditText
                android:layout_width="match_parent"
                android:layout_height="wrap_content"
                android:gravity="center_vertical"
                android:hint="Password를 입력 해 주세요."
                android:layout_marginRight="25dp"

                />
        </LinearLayout>
        <LinearLayout
            android:layout_width="match_parent"
            android:layout_height="0dp"
            android:layout_weight="1"
            >
            <Button
                android:layout_width="match_parent"
                android:layout_height="match_parent"
                android:layout_weight="1"
                android:text="로그인"
                android:background="#cc0033"
                android:layout_margin="15dp"
                />
            <Button
                android:layout_width="match_parent"
                android:layout_height="match_parent"
                android:layout_weight="1"
                android:text="회원가입"
                android:background="#cc0033"
                android:layout_margin="15dp"
                />
        </LinearLayout>
    </LinearLayout>
</LinearLayout>
LinearLayout (리니어 레이아웃)만을 사용하여 로그인 화면을 간단하게 구현하였습니다. 실제로 코딩을 할 때는 리니어 레이아웃 뿐만아니라 다른 레이아웃들과 함께 자신이 구현하기 편한 레이아웃을 선택하여 프로그래밍을 하면 작업효율이 더 올라갑니다.
레이아웃(Layout)으로 UI를 제작 한 후에 액티비티(Activity)에서 코딩을 하여 작동을 합니다.
'앱 비지니스 > 안드로이드 스튜디오' 카테고리의 다른 글
| [안드로이드 앱 만들기 레이아웃 예제] 3. 계산기 만들기 (0) | 2021.02.08 |
|---|---|
| [안드로이드 앱 만들기 레이아웃 예제] 2. SNS 화면 만들기 (0) | 2021.02.05 |
| [안드로이드 앱 만들기 기초] Layout(레이아웃) 속성, 사용법 모음 (0) | 2021.02.04 |
| [안드로이드 앱 만들기 기초] ConstraintLayout(컨스트레인트 레이아웃) 사용법, 속성 (0) | 2021.02.03 |
| [안드로이드 앱 만들기 기초] TableLayout(테이블 레이아웃) 사용법, 속성 (0) | 2021.02.02 |


댓글