Layout(레이아웃)들의 속성과 사용법 모음
앞서 얘기한 레이아웃들의 속성을 모아 놓았습니다.
프로그램 제작 시 필요할때 꺼내 보는식으로 보면 좋을듯 합니다.
0. 바로가기
0-1. Linear레이아웃
0-2. Relative레이아웃
0-3. Table레이아웃
0-4. Constraint레이아웃
1. LinearLayout (리니어 레이아웃)
속성
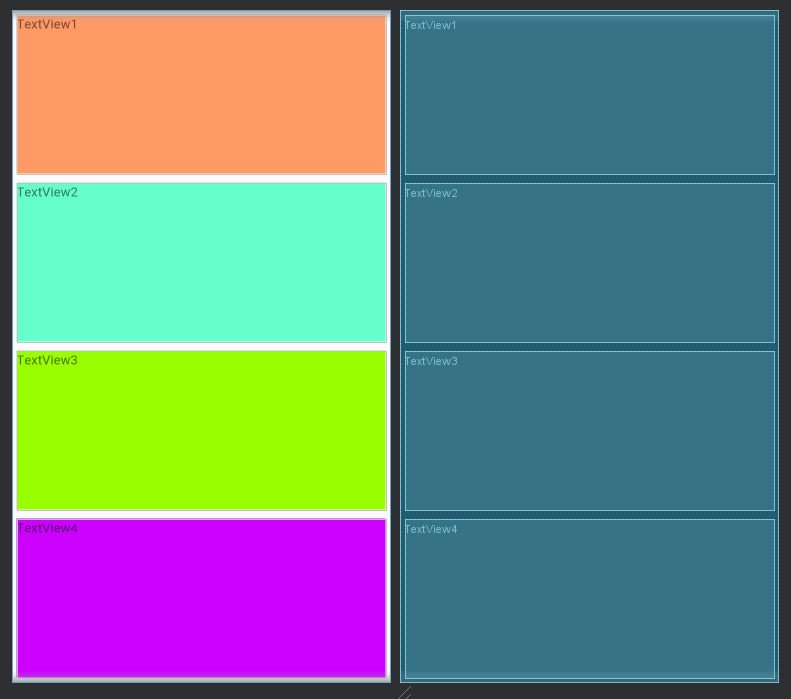
orientation - horizontal, vertical 나열 방향을 정합니다.
weight - 가중치를 정합니다.
<LinearLayout xmlns:android="http://schemas.android.com/apk/res/android"
    xmlns:tools="http://schemas.android.com/tools"
    android:layout_width="match_parent"
    android:layout_height="match_parent"
    tools:context=".MainActivity"
    android:orientation="horizontal">
    <TextView
        android:layout_width="match_parent"
        android:layout_height="match_parent"
        android:text="TextView1"
        android:layout_weight="1"
        android:background="#ff9966"
        android:layout_margin="5dp"
        />
    <TextView
        android:layout_width="match_parent"
        android:layout_height="match_parent"
        android:text="TextView2"
        android:layout_weight="1"
        android:background="#66ffcc"
        android:layout_margin="5dp"
        />
    <TextView
        android:layout_width="match_parent"
        android:layout_height="match_parent"
        android:text="TextView3"
        android:layout_weight="1"
        android:background="#99ff00"
        android:layout_margin="5dp"
        />
    <TextView
        android:layout_width="match_parent"
        android:layout_height="match_parent"
        android:text="TextView4"
        android:layout_weight="1"
        android:background="#cc00ff"
        android:layout_margin="5dp"
        />
</LinearLayout>
<LinearLayout xmlns:android="http://schemas.android.com/apk/res/android"
    xmlns:tools="http://schemas.android.com/tools"
    android:layout_width="match_parent"
    android:layout_height="match_parent"
    tools:context=".MainActivity"
    android:orientation="vertical">
    <TextView
        android:layout_width="match_parent"
        android:layout_height="match_parent"
        android:text="TextView1"
        android:layout_weight="1"
        android:background="#ff9966"
        android:layout_margin="5dp"
        />
    <TextView
        android:layout_width="match_parent"
        android:layout_height="match_parent"
        android:text="TextView2"
        android:layout_weight="1"
        android:background="#66ffcc"
        android:layout_margin="5dp"
        />
    <TextView
        android:layout_width="match_parent"
        android:layout_height="match_parent"
        android:text="TextView3"
        android:layout_weight="1"
        android:background="#99ff00"
        android:layout_margin="5dp"
        />
    <TextView
        android:layout_width="match_parent"
        android:layout_height="match_parent"
        android:text="TextView4"
        android:layout_weight="1"
        android:background="#cc00ff"
        android:layout_margin="5dp"
        />
</LinearLayout>
2. RelativeLayout(렐러티브 레이아웃)
속성
2-1. 뷰로 설정
layout_to[위치]Of="[대상]" - [대상]의 [위치]로 지정. 사용 가능 위치 Right, Left, above(위), below(밑), StartOf, EndOf
layout_align[위치]="[대상]" - [대상]의 [위치]로 정렬. 사용 가능 위치 Right Left Top Bottom Baseline(기본 라인)
2-2. true/false값으로 설정
layout_alignParentRight="true" 부모의 오른쪽
layout_alignParentLeft="true" 부모의 왼쪽
layout_alignParentTop="true" 부모의 위쪽
layout_alignParentBottom="true" 부모의 아랫쪽
layout_centerInParent="true" 부모의 가운데
layout_centerHorizontal="true" 부모의 수평 가운데
layout_centerVertical="true" 부모의 수직 가운데
layout_alignParentStart="true" 부모의 시작지점
layout_alignParentEnd="true" 부모의 끝지점
<RelativeLayout xmlns:android="http://schemas.android.com/apk/res/android"
    xmlns:tools="http://schemas.android.com/tools"
    android:layout_width="match_parent"
    android:layout_height="match_parent"
    tools:context=".MainActivity">
    <TextView
        android:id="@+id/A"
        android:layout_width="75dp"
        android:layout_height="75dp"
        android:text="A"
        android:textSize="50dp"
        android:gravity="center"
        android:layout_centerInParent="true"
        android:background="#ff9966"
        />
    <TextView
        android:id="@+id/B"
        android:layout_width="75dp"
        android:layout_height="75dp"
        android:text="B"
        android:textSize="50dp"
        android:gravity="center"
        android:layout_below="@id/A"
        android:background="#66ffcc"
        android:layout_toRightOf="@id/A" />
    <TextView
        android:id="@+id/C"
        android:layout_width="75dp"
        android:layout_height="75dp"
        android:text="C"
        android:textSize="50dp"
        android:gravity="center"
        android:layout_below="@id/B"
        android:layout_toLeftOf="@id/B"
        android:background="#99ff00"
        />
    <TextView
        android:id="@+id/D"
        android:layout_width="75dp"
        android:layout_height="75dp"
        android:text="D"
        android:textSize="50dp"
        android:gravity="center"
        android:layout_toLeftOf="@id/C"
        android:layout_below="@id/C"
        android:background="#cc00ff"
        />
</RelativeLayout>
3. TableLayout(테이블 레이아웃)
속성
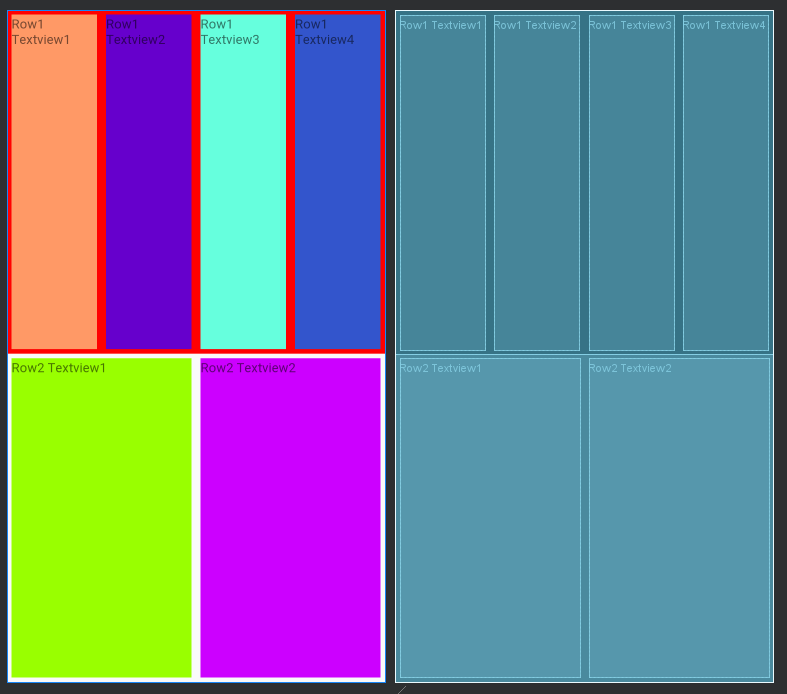
<TableRow></TableRow> - 테이블 레이아웃의 행을 추가 해줍니다.
weight - 가중치를 추가 해줍니다.
layout_span="정수" 지정한 정수 만큼 행을 합쳐줍니다.
<TableLayout xmlns:android="http://schemas.android.com/apk/res/android"
    xmlns:tools="http://schemas.android.com/tools"
    android:layout_width="match_parent"
    android:layout_height="match_parent"
    tools:context=".MainActivity"
    >
    <TableRow
    android:layout_height="0dp"
    android:layout_weight="1"
    android:background="#FF0000">
    <TextView
        android:layout_width="match_parent"
        android:layout_height="match_parent"
        android:text="Row1 Textview1"
        android:layout_weight="1"
        android:background="#ff9966"
        android:layout_margin="5dp"
        />
    <TextView
        android:layout_width="match_parent"
        android:layout_height="match_parent"
        android:text="Row1 Textview2"
        android:layout_weight="1"
        android:background="#6600cc"
        android:layout_margin="5dp"
        />
    <TextView
        android:layout_width="match_parent"
        android:layout_height="match_parent"
        android:text="Row1 Textview3"
        android:layout_weight="1"
        android:background="#66ffdd"
        android:layout_margin="5dp"
        />
    <TextView
        android:layout_width="match_parent"
        android:layout_height="match_parent"
        android:text="Row1 Textview4"
        android:layout_weight="1"
        android:background="#3355cc"
        android:layout_margin="5dp"
        />
</TableRow>
    <TableRow
        android:layout_height="0dp"
        android:layout_weight="1">
        <TextView
            android:layout_width="match_parent"
            android:layout_height="match_parent"
            android:text="Row2 Textview1"
            android:layout_weight="1"
            android:background="#99ff00"
            android:layout_margin="5dp"
            />
        <TextView
            android:layout_width="match_parent"
            android:layout_height="match_parent"
            android:text="Row2 Textview2"
            android:layout_weight="1"
            android:background="#cc00ff"
            android:layout_margin="5dp"
            />
    </TableRow>
</TableLayout>
4. ConstraintLayout(컨스트레인트 레이아웃)
속성
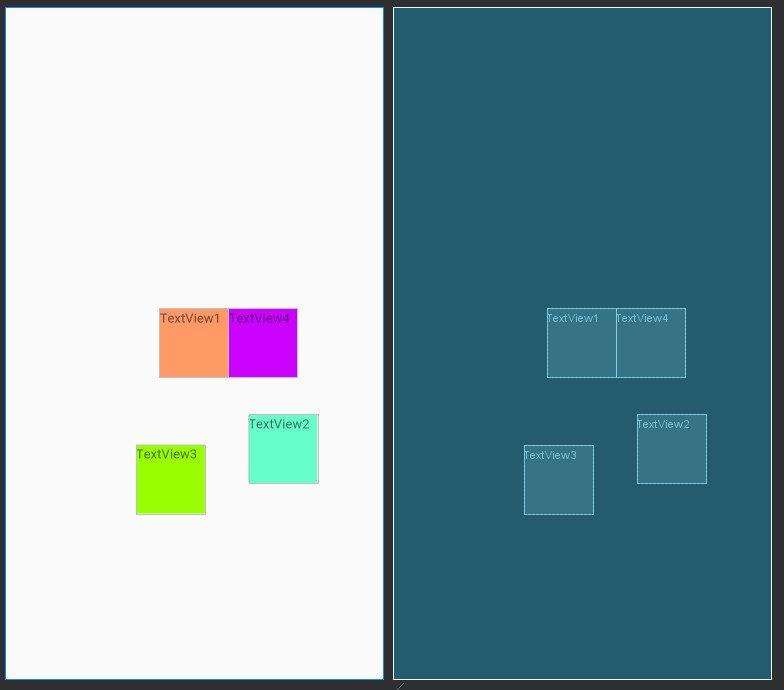
layout_constraint[위치1]_to[위치2]Of="[대상]" - 지정 할 뷰의 [위치1]을 [대상]의 [위치2]에 지정합니다. 위치에 들어갈 코드는 Right, Left, Top, Bottom, Baseline, Start, End가 있습니다.
layout_constraintCircle="대상" - 원을 만들 대상을 정합니다.
layout_constraintCircleRadius="숫자" - 원의 크기를 정합니다.
layout_constraintCircleAngle="0~360" - 원에서 위치가 될 각도를 지정합니다.
<androidx.constraintlayout.widget.ConstraintLayout xmlns:android="http://schemas.android.com/apk/res/android"
    xmlns:tools="http://schemas.android.com/tools"
    android:layout_width="match_parent"
    android:layout_height="match_parent"
    xmlns:app="http://schemas.android.com/apk/res-auto"
    tools:context=".MainActivity">
    <TextView
        android:id="@+id/t1"
        android:layout_width="75dp"
        android:layout_height="75dp"
        android:text="TextView1"
        app:layout_constraintLeft_toLeftOf="parent"
        app:layout_constraintRight_toRightOf="parent"
        app:layout_constraintTop_toTopOf="parent"
        app:layout_constraintBottom_toBottomOf="parent"
        android:background="#ff9966"
        />
    <TextView
        android:layout_width="75dp"
        android:layout_height="75dp"
        android:text="TextView2"
        app:layout_constraintCircle="@+id/t1"
        app:layout_constraintCircleRadius="150dp"
        app:layout_constraintCircleAngle="140"
        android:background="#66ffcc"
        />
    <TextView
        android:layout_width="75dp"
        android:layout_height="75dp"
        android:text="TextView3"
        app:layout_constraintCircle="@+id/t1"
        app:layout_constraintCircleRadius="150dp"
        app:layout_constraintCircleAngle="190"
        android:background="#99ff00"
        />
    <TextView
        android:layout_width="75dp"
        android:layout_height="75dp"
        android:text="TextView4"
        app:layout_constraintLeft_toRightOf="@id/t1"
        app:layout_constraintTop_toTopOf="@id/t1"
        android:background="#cc00ff"
        />
</androidx.constraintlayout.widget.ConstraintLayout>
레이아웃의 사용법과 속성에 대한 설명글은 해당 링크에서 확인 가능합니다.
[안드로이드 앱 만들기 기초] LinearLayout(리니어 레이아웃) 사용법, 속성 (tistory.com)
[안드로이드 앱 만들기 기초] LinearLayout(리니어 레이아웃) 사용법, 속성
LinearLayout 사용법, 속성 레이아웃(Layout)의 종류 중 하나인 LinearLayout에 대해 더 자세히 알아 보겠습니다. LinearLayout (리니어 레이아웃) Linear(선의, 선형의)의 뜻처럼 가로나 세로 방향으로 나열 할.
codenet.tistory.com
[안드로이드 앱 만들기 기초] RelativeLayout(렐러티브 레이아웃) 사용법, 속성 (tistory.com)
[안드로이드 앱 만들기 기초] RelativeLayout(렐러티브 레이아웃) 사용법, 속성
RelativeLayout 사용법, 속성 레이아웃(Layout)의 종류 중 하나인 RelativeLayout에 대해 더 자세히 알아 보겠습니다. RelativeLayout(렐러티브 레이아웃) Relative(상대적인)Lauout은 기준의 위치에 따라 상대적..
codenet.tistory.com
[안드로이드 앱 만들기 기초] TableLayout(테이블 레이아웃) 사용법, 속성 (tistory.com)
[안드로이드 앱 만들기 기초] TableLayout(테이블 레이아웃) 사용법, 속성
TableLayout 사용법, 속성 레이아웃(Layout)의 종류 중 하나인 TableLayout에 대해 더 자세히 알아 보겠습니다. TableLayout(테이블 레이아웃) Table(표)Layout은 뷰들을 표처럼 배치 할 수 있습니다. 일반적인 표
codenet.tistory.com
[안드로이드 앱 만들기 기초] ConstraintLayout(컨스트레인트 레이아웃) 사용법, 속성 (tistory.com)
[안드로이드 앱 만들기 기초] ConstraintLayout(컨스트레인트 레이아웃) 사용법, 속성
ConstraintLayout사용법, 속성 레이아웃(Layout)의 종류 중 하나인 ConstraintLayout에 대해 더 자세히 알아 보겠습니다. ConstraintLayout(컨스트레인트 레이아웃) Constraint(제약, 제한, 조건)Layout은 뷰에 여..
codenet.tistory.com
더 자세한 설명은 개발자 페이지에서 확인 가능합니다.
레이아웃 | Android 개발자 | Android Developers
레이아웃 | Android 개발자 | Android Developers
레이아웃은 활동 또는 앱 위젯의 UI와 같은 사용자 인터페이스의 시각적 구조를 정의합니다. 두 가지 방법으로 레이아웃을 선언할 수 있습니다. Android 프레임워크를 통해 이 두 가지 메서드의 하
developer.android.com
'앱 비지니스 > 안드로이드 스튜디오' 카테고리의 다른 글
| [안드로이드 앱 만들기 레이아웃 예제] 2. SNS 화면 만들기 (0) | 2021.02.05 |
|---|---|
| [안드로이드 앱 만들기 레이아웃 예제] 1. 로그인 화면 만들기 (0) | 2021.02.04 |
| [안드로이드 앱 만들기 기초] ConstraintLayout(컨스트레인트 레이아웃) 사용법, 속성 (0) | 2021.02.03 |
| [안드로이드 앱 만들기 기초] TableLayout(테이블 레이아웃) 사용법, 속성 (0) | 2021.02.02 |
| [안드로이드 앱 만들기 기초] RelativeLayout(렐러티브 레이아웃) 사용법, 속성 (0) | 2021.02.01 |


댓글